
Fundamentals of Cable Enclosure Sizing
Defining Cable Trunking and Its Main Purpose
In the realm of modern electrical installation, precision is the quiet custodian of safety. A common oversight among contractors is assuming that a larger enclosure offers a premium level of slack. Yet, the true fundamentals of cable enclosure sizing rest on a strict mathematical floor: the total cross-sectional area of the conductors must not exceed 40% of the internal duct area. This ratio leaves enough space for heat dissipation and prevents the insulation from being crushed during installation. The path forward begins with a meticulous 3D spatial survey, not a visual guesstimate.
At its core, defining cable trunking and its main purpose is about structured restraint. Trunking is the metal or PVC backbone that organises the electrical arteries of a building. It protects vulnerable wiring from physical impact and environmental moisture, while offering a removable cover for future maintenance. However, the utilitarian nature of the product often masks its hidden role as a strategic asset. An efficient layout reduces the labour cost of pulling cables and minimises the friction that causes jacket abrasion.
To resolve a system properly, one must consider three distinct functions:
– Physical protection from surface-level damage.
– Segregation of high and low voltage circuits to prevent interference.
– A dedicated pathway for future scalability.
These roles demand that the installer always perform a trunking measurement before cutting any length. This practice ensures the chosen profile matches the wall’s structural configuration, avoiding the awkward workarounds that plague retrospective fixes. When installation is done with legislative compliance in mind, the enclosure ceases to be a simple duct and becomes a silent partner in the building’s electrical longevity. Measure twice, and the maintenance culture shifts from reactive panic to routine calm.
Common Materials, Shapes, and Configurations
The enclosure’s geometry dictates its capacity, and the material dictates its fate. Steel trunking endures the harsh coastal salt of Durban, while PVC shrugs off corrosive industrial atmospheres. Each profile, from square to rectangular, offers a different cross sectional area for the conductors within. A shallow tray may seem sufficient, yet it forces cables into a cramped, heat retaining pile.
Common configurations include:
- Standard rectangular trunking for surface runs.
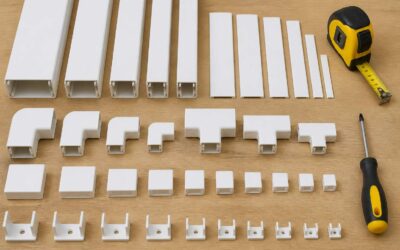
- Compact mini trunking for shallow wall cavities.
- Heavy duty variants for exposed plant rooms.
The trunking measurement must account for the lid’s depth, not merely the base width. The 40% fill ratio remains the binding rule, regardless of the profile’s aesthetic promise. Selecting a shape without a precise trunking measurement invites a future of strained lids and overheated insulation.
Why Precision Matters in Cable Management
The difference between a neat cable run and a jammed conduit comes down to one number: the trunking measurement. In South Africa, electricians routinely wrestle with oversized bundles in undersized enclosures. A 40% fill ratio is not a suggestion, it is the boundary between safe operation and thermal failure.
Precision matters because space is not the only variable. Heat dissipation, future expansion, and cable bending radius all depend on accurate sizing. Consider these fundamentals:
- Measure the internal width and depth, not the external profile.
- Account for the lid’s intrusion into the usable area.
- Verify the fill ratio against the total cable cross sectional area.
This is where my clients often slip. They look at the base width and assume the capacity. The trunking measurement must include the lid depth, or the enclosure becomes a heat trap. One missed millimetre could mean a tripped breaker during loading season.
Tools and Techniques for Precise Dimensioning
Hand Tools for Reaching Tight Spaces
In the cramped corners of cable containment, your thumb becomes a liar. A single millimetre off in a recessed joint can derail an entire installation, and I have watched seasoned electricians trust their eyes only to curse the resulting gap. For reliable trunking measurement, reaching tight spaces demands tools that respect the physical reality of confined angles. A standard ruler bends, a tape curls, but a pair of spring calipers locks onto the true width without flexing.
Consider these essentials for awkward positions:
- A digital vernier calliper with a depth rod for internal channels.
- An offset leg calliper that reaches past protruding lips.
- A telescoping gauge to transfer diameters from blind holes.
Each tool converts an uncomfortable stretch into a repeatable number. The technique lies in a deliberate pivot of the wrist, not muscle memory. Measure twice, once with the tool angled up and once straight on, then trust the lower reading. Accuracy here becomes a quiet conversation between your hand and the material itself.
Laser Displacement Sensors and Digital Calipers
A standard ruler and a set of calipers carry a margin of error that many installers accept without question, yet a tolerance of 0.1 millimetres can define the difference between a seamless joint and a costly rework. Modern standards for trunking measurement demand more than a steady hand; they require a shift toward non contact verification. Laser displacement sensors offer a solution that removes physical contact entirely, emitting a focused beam to capture a surface profile in milliseconds. This method excels when measuring vibrating conduits or freshly cut extrusions where a physical probe might deform the material.
Digital calipers remain the workhorse for direct, high resolution checks, especially when you need to confirm the internal dimensions of a channel after cutting. These tools record measurements with a precision that analogue scales cannot match, and their data output ports allow you to log readings directly into a quality control spreadsheet.
– Laser sensors deliver repeatable results at a distance of several metres.
– Digital calipers provide immediate confirmation of width and depth tolerances.
– Both tools generate data that can be stored for compliance audits.
Knowing when to deploy each device is part of a comprehensive approach to trunking measurement. The decision depends on access, material flexibility, and the required speed of inspection. Static components with rigid geometry suit calipers, while moving production lines benefit from the rapid sampling rate of a laser system. Professionals in South Africa who pair these tools eliminate the guesswork from their process, ensuring every section of trunking aligns with the specification before installation begins.
Choosing Between Imperial and Metric Readings
A 3 millimetre misread on a ruler can cost a full day of rework when it forces a trunking run out of alignment with its fixing points. That is not an exaggeration; it is the arithmetic of compounded error. For trunking measurement, the unit scale you choose determines whether a recorded value is usable in the next stage of fabrication. South African sites run on metric dimensions, but imported components and legacy infrastructure often arrive with imperial markings, and the two systems do not blend gracefully.
Metric readings rule this trade. Millimetres are the language of the specification sheet, and any dimension that lands on a fractional inch feels foreign even before conversion. The 3/8 inch bolt pattern on an imported support bracket is not 10 millimetres, no matter how many installers round it to that. It is 9.525 millimetres. When the trunking measurement feeds a CNC cutting schedule or a laser profiling report, that 0.475 millimetre gap becomes a permanent feature of every joint.
Common traps appear when switching between scales mid-project:
- 1 inch conduit is 25.4 millimetres, not 25, and the 0.4 millimetre adds up across twelve couplings.
- 3/8 inch is 9.525 millimetres, often rounded down to 9.5, which is acceptable for clearance but fatal for alignment.
- A 6 foot section is 1.8288 metres, not 1.8, a difference that throws off every second fixing point.
The technique for precise dimensioning starts with locking one unit, not two. Confirm that the drawing, the supplier datasheet, and the tool on site all speak the same language before the first reading. I have watched a technician record a value from the imperial edge of an old folding ruler while the engineer’s specification was in millimetres. The error surfaced during the first trunking measurement audit, but only because the data entry protocol forced him to write the unit next to every value. That habit alone prevents most scale confusion.
Digital instruments make switching effortless, which creates a new problem. A device that toggles between metric and imperial with a single button press will store data in whatever scale was active at the time. Forgetting to switch the readout back to millimetres can populate a quality log with inch values and render the entire batch unverifiable. South African production floors have begun locking the unit setting before any trunking measurement session, a small procedural step that eliminates the most common source of dimensional error in cable management.
Checking for Obstructions and Irregularities
Obstructions are easy to miss. A fire suppression pipe running parallel to the proposed trunking route can shift the entire fixing schedule by 40 millimetres without looking like a problem. The first trunking measurement should start with a slow walk along the mounting surface, not with a tool in hand. Scan for irregularities that will force adjustments later:
– Uneven plaster that lifts the trunking back face off the wall
– Existing cable bundles occupying the intended fixing zone
– Structural columns that break a long run into awkward segments
Measure from the obstruction, not from the idealised line on the drawing. The drawing shows the building as designed. The site shows the building as built. The second one wins every argument. A laser level helps, but your eyes catch the subtle bow in a wall that no instrument can correct for. Every trunking measurement should include a clearance check at each fixing point.
Recording Measurement Data Efficiently
Precision in trunking measurement is less about the instrument and more about how you handle the reading. I prefer a steel tape for short runs because it holds its shape, and a rotating laser for tall vertical paths. But the real skill lies in writing down the number before you move. A voice memo on your phone works too, as long as you speak the dimension aloud and verify it after playback.
Recording data efficiently means building a system that survives the journey back to the office. I use a simple field sheet with columns for distance, height, and clearance. For each measuring session:
- Label the wall or column with an identifier.
- Note the zero point for every trunking measurement.
- Confirm each reading twice before moving to the next point.
That sequence keeps the numbers honest. Without it, a single misplaced value turns a clean installation into a series of wedge-shaped gaps.
Capacity Calculations and Fill Ratio Guidelines
Calculating Cable Cross-Sectional Area
Ever packed a suitcase only to sit on it, pleading with the zipper? Cable trunking behaves the same way, except the zipper is your fill ratio. Overstuffing a channel invites heat buildup and makes future cable pulls miserable. Most South African installations follow a 40% fill ratio for multiple cables, while single cables may reach 60%. Accurate trunking measurement, though, goes beyond outer dimensions; you must also know the true cross-sectional area of every cable inside.
Calculating cable cross-sectional area starts with the conductor diameter, insulation included. The process is simple:
- Measure the diameter of the cable.
- Divide by two to get the radius.
- Square the radius and multiply by pi.
Sum the values for all cables and compare that total with the trunking’s internal area. That comparison tells you whether your design stays within the fill ratio guidelines. Skip this step and you’re essentially guessing, which is never a good idea when you’re dealing with heat dissipation and future maintenance.
Understanding the 40% Fill Rate Convention
In South Africa, the 40% fill rate convention is more than a guideline; it is the ceiling for safe and functional trunking measurement. Many installers assume that any cable bundle will fit if it closes, but the real test is the ratio of total cable area to the internal trunking area. That ratio determines whether heat can escape and whether a cable can be pulled out later without tearing the insulation.
For trunking measurement, the calculation is straightforward. Sum the cross-sectional area of every cable, then divide by the internal area of the trunking. The result should sit at 40% or below for multiple cables. A single cable may take up to 60%, but that is the exception, not the rule.
Several factors affect the actual fill capacity:
- Insulation thickness on each cable
- Bending radius requirements at corners
- The grouping of cables versus loose laying
These variables make the 40% convention a practical starting point, not a guarantee of compliance. Accurate measurement, then, is about applying the ratio consistently, not just reading a tape.
Factoring in Bending Radius and Heat Dissipation
Overlooking physics is how real installations fail before they energise. The 40% fill standard is a mathematical ceiling, yet the shape of the applied load changes everything inside the channel. A bundle of flexible thin cables behaves differently to one rigid armoured cable, and that difference dictates the true calculation for trunking measurement.
The dimensions of the cable are only half of the formula. You must also account for the space required to maintain the minimum bending radius at each pull point. Tight corners compress insulation and strain conductors, which is why the physical path often requires more internal volume than the raw area sum suggests.
Several variables shift the final allowable fill:
– Conductor bending radius requirements
– The specific ampacity of the circuit, which determines acceptable heat retention
– Grouping factors, where derating values increase the required air gap
Each variable alters the safe area ratio. Heat dissipation is the silent constraint, as trapped warmth accelerates insulation ageing well before any trip mechanism notices the shift. Capacity is therefore a balancing act between geometry and thermal reality.
Predicting Future Load and Expansion Needs
Load forecasting is where most capacity plans fail. A trunking measurement taken today becomes useless in five years if you only calculate for the current cable count. The 40% fill ratio leaves headroom, but that headroom is not intended for indefinite additions. It exists to accommodate unavoidable future changes without requiring a re-pull.
When predicting expansion, I have seen conductor volume and practical pull force change everything. A full channel becomes a maintenance liability. Fill ratio should be treated as a flexible limit, not a static number. Future circuits alter thermal profiles, and the smartest measurement accounts for tomorrow’s wiring load along with today’s.
Standards and Best Practices for Cable Enclosure Sizing
Reference to Global and Local Electrical Standards
When sizing cable enclosure systems in South Africa, trunking measurement must align with SANS 10142-1 for wiring of premises and IEC 61386 for conduit systems. These standards define minimum clearances, support spacing, and mechanical protection requirements that directly influence enclosure dimensions. A common oversight is treating global specifications as universally applicable without checking local amendments.
Best practices demand that trunking measurement accounts for both the conductor bundle’s actual cross-section and the specific environmental conditions where the trunking will be installed. For example, flame retardant properties and ingress protection ratings vary between indoor and outdoor applications, and these factors affect the effective usable space inside the enclosure.
- Verify the applicable SANS edition before starting any trunking measurement.
- Cross reference local regulations with the latest IEC guidelines to confirm equivalent requirements.
- Document the standard referenced in your measurement records for audit trails.
Ignoring regional deviations from international norms creates compliance gaps. While IEC documents serve as the baseline, South African installations must satisfy local legal obligations, and the interaction between these frameworks often shifts the practical sizing approach. This dual compliance requirement applies whether you work on residential distribution boards or industrial cable trays.
Setting Up Tolerances and Verification Procedures
The quiet variable in any trunking measurement is tolerance. A digital caliper that reads within 0.05 mm on a bench can drift by more than a millimetre when braced against a vibrating cable tray. That drift becomes a compliance failure long before the inspector arrives, and I have watched it happen on perfectly good installations.
Verification procedures must exist before the first reading. Set reference points that align with the enclosure’s usable internal dimensions, not its nominal external size. Establish a verification routine that covers:
- Instrument calibration against a gauge block before each working shift.
- Reconfirmation after every twenty readings, especially in dust heavy environments.
- A documented decision on whether to measure bare metal or powder coated surfaces, applied consistently across every log.
Electroplated finishes add their own uncertainty to trunking measurement. Choose once, record the choice, and apply it without exception. The difference between measuring the substrate and the coating can exceed the entire allowable tolerance for smaller trunking profiles.
Maintaining Clear Documentation and Labels
Every trunking measurement carries the weight of an audit trail, yet most documentation reads like a crime scene with missing evidence. In South Africa, where SANS and IEC standards govern installation integrity, the paperwork must match the physical reality with unsettling precision.
Best practice demands that enclosure sizing records include the actual fill percentage calculated, not the theoretical maximum. The measurement data should reference the exact standard clause used, the instrument serial number, and the ambient conditions. A measurement taken during a Highveld thunderstorm will differ from one taken at noon in the Karoo.
Documentation controls must be as rigorous as the verification procedure itself:
- Label every cable enclosure with the installation date, the responsible engineer, and the measurement reference number.
- Archive calibration certificates alongside the trunking measurement logs, never separately.
- Indicate which surface finish was measured, bare or coated, on every single entry.
Labels belong inside the enclosure too, not just on the exterior. The internal label should record the exact usable depth and width of the trunking, the measured fill rate, and the revision date. This internal marking becomes the reference point for every future inspection.
Without this documented discipline, a trunking measurement is just a number floating in a forgotten notebook, and an inspector will treat it exactly that way.
Common Pitfalls to Avoid During Cable Enclosure Measurement
Measuring Inside Outer Edges Versus Actual Interior Space
One of the most common mistakes I see on site is treating the outside of the enclosure as usable space. The outer edges of a trunking run look clean, but the interior is what actually matters. Wall thickness, internal ribs, and corner radii all reduce the real capacity. If you base your trunking measurement on external dimensions, you end up with a system that looks right but cannot accommodate the cables.
Manufacturers specify interior dimensions, but tolerances vary. A 40mm trunking does not always give you 40mm of usable space inside. Measure the interior width and height at several points along the run.
Here are three pitfalls to watch for:
- Relying on the nominal size stamped on the product
- Measuring only at one end where material may be thinner
- Ignoring internal dividers that reduce available volume
Verify interior space directly during any trunking measurement. It takes one minute and saves a serious headache later!
Ignoring Obstructions at Corners and Joins
A few millimetres of misalignment at a corner can undermine an entire installation, and it is the most costly type of oversight to correct after the fact. When a trunking run bends around a pillar or changes direction, the internal space narrows dramatically. The centre radius of the bend often forces a cable against an internal rib, reducing the available cross-sectional area to a fraction of the straight run. You cannot assume that a 90 degree fitting provides the same volume as the standard channel.
Joins present their own set of problems, especially where sections meet at varying angles or when a coupler has been overtightened. The dimensional shift at these points is often greater than the tolerance specified for the straight sections.
– Always measure the interior width and height at the exact point of the coupler, not just adjacent to it.
– Account for the protruding locking tabs or clips that intrude into the channel.
– Verify that the manufacturer’s stated corner radius actually matches the physical bend.
What appears to be a solid connection on the exterior can hide a bottleneck that strands a heavy cable bundle halfway through the pull. In practice, I have seen installers measure the open ends of two straight sections and assume the intervening joint maintains the same profile; it does not. The more fittings you add, the more complex your trunking measurement becomes, because every deviation introduces a new variable. Treat each corner and join as an independent zone that requires its own calculation. The final cable fill rate depends entirely on these critical stress points, and a single overlooked obstruction transforms a compliant design into a failed one. Spend time inspecting the entire path, not just the visible open ends.
Relying on Visual Estimation Instead of Physical Checks
The human eye is a marvellous instrument, but it has no place in trunking measurement. A quick glance along a channel suggests tidy alignment, yet shadows hide the warped lip and the displaced coupler. Physical checks with a calibrated tool reveal misalignments invisible from above. On site, the installer who trusts his gaze often returns for a second trip, a third measurement, and a long conversation with the client. Consider the common assumptions made during a visual pass:
- That a straight run appears straight because it looks straight.
- That a fitting aligns because its edges meet.
- That a cover closes flush because it clicks shut.
Each assumption invites error. South African installations on uneven concrete slabs make visual estimation even less reliable. The floor grade, the wall profile, the light angle: all deceive. Trunking measurement demands hands on the material, fingers on the joint, and a digital caliper in the palm. Seeing is not verifying. Measuring is.
Forgetting to Account for Existing and Predicted Cables
Forgetting to account for existing and predicted cables is one of the most common pitfalls in trunking measurement. Installers measure an empty channel and celebrate the available volume, only to discover later that the existing conductors already consume a substantial portion. This oversight reveals itself during the pull-through, not the planning phase.
South African sites complicate this further. Distribution boards in older buildings accumulate cabling over the years, and that accumulation rarely follows the original design. A trunking measurement captures fixed dimensions, but the occupied volume keeps shifting. A reliable estimate requires a survey of what is already inside, including cables that are not perfectly bundled and spares that remain unterminated.
These factors matter when calculating usable capacity:
- Every existing cable, including abandoned runs, reduces available space.
- Predicted cable additions should reflect actual load growth, not optimistic projections.
- Existing cables are rarely packed with the efficiency the designer assumed.


0 Comments