Understanding Trunking and Conduit Systems
Defining cable trunking and its common applications
Most cable failures trace back to a single weak point: the trunking to conduit connection. Trunking, a rectangular housing, carries cables along exposed surfaces. Conduit piping protects them through voids and penetrations. In South African facilities, this handoff often occurs near machinery or wall exits. Properly engineered, it maintains cable integrity for decades. Poorly done, it invites moisture and sharp-edged wear.
Common trunking applications include perimeter lighting, security systems, and machinery supply lines. Each scenario tests the connection differently. A workshop may require frequent reconfiguration. That flexibility gets lost if the transition is rigid or inaccessible. Understanding trunking and conduit systems means planning for expansion.
What is conduit and where it is typically installed
Conduit is the pipe that carries cables through places trunking cannot go. It is typically installed inside poured concrete, underground between buildings, or along fire escapes where surface mounting would invite damage. Unlike trunking, which remains accessible, conduit often disappears into the structure itself. This makes the trunking to conduit connection the single most inspected joint on any maintenance schedule.
Typical conduit installations include:
- Embedded in floor slabs for machine supply lines.
- Within ceiling voids above cleanrooms.
- Across roof parapets for lightning protection.
Each location changes how the connection must be sealed. A floor slab demands watertight compression fittings. A ceiling void needs fire-rated collars. I have yet to see a single solution that works across all three. The trunking to conduit connection is rarely the same twice, and that is precisely why it fails when installed without regard to its environment.
Why installers need a reliable transition between trunking and conduit
Every cable containment network is only as strong as its weakest junction. For many South African installers, that junction is the trunking to conduit connection. Trunking offers accessible, reconfigurable cable management inside the building. Conduit takes over where trunking cannot follow. The transition must maintain earth continuity, protect conductors, and resist whatever the environment imposes.
Consider what changes between sites:
- How the cable turns from horizontal to vertical.
- How the fitting is secured to the structural wall.
- How the entry point is sealed against moisture.
A connection that holds up in a Gauteng warehouse may fail within a season on the Cape coast, where salt air corrodes unprotected fittings. Installers who understand this treat the trunking to conduit connection as a deliberate engineering step, not an afterthought. That discipline separates a containment system that lasts decades from one that demands rework within months.
Essential Components for Trunking to Conduit Connections
Transition adapters and couplers: the core connector
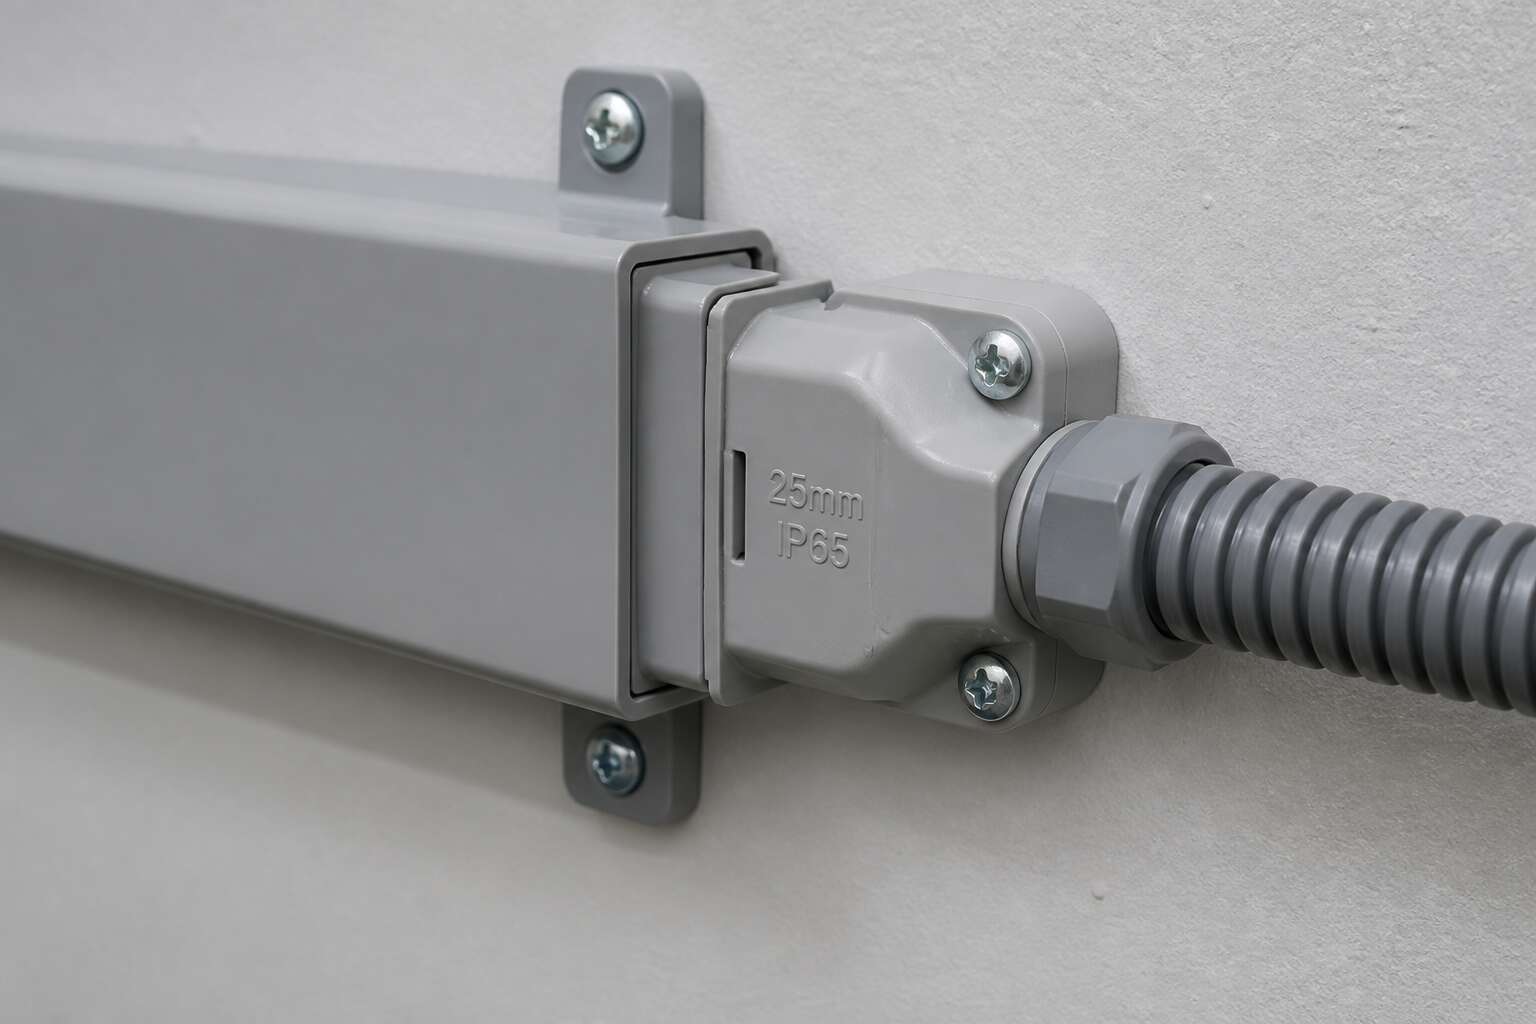
Roughly a third of electrical compliance failures in South African industrial sites occur at transition points. The transition adapter and coupler deserve more attention than the conduit run itself. A robust trunking to conduit connection requires an adapter that matches the rectangular profile of trunking to the circular profile of conduit. A coupler locks the two systems together without collapsing the internal bore.
Installers working with 20mm or 25mm metric conduit will find threaded and push-fit options in PVC and nylon. Nylon handles heat better. PVC remains economical. Key factors include:
- The ingress protection rating when the run is exposed to weather
- A locking ring to prevent vibration loosening the joint
The most durable trunking to conduit connection I have inspected used a compression coupler with a bonded gasket. It kept water out and allowed thermal movement. Such a fitting remains serviceable for decades.
Reducing bushes for size mismatches
Reducing bushes resolve the size mismatch when a 20mm conduit meets a 40mm trunking outlet. Without one, the installer leaves a gap that invites dust and moisture. The trunking to conduit connection loses its integrity. A reducing bush steps down the bore gradually, preserving flow and protecting the cable’s bend radius.
Selection matters for this component:
- Thread compatibility with the conduit’s metric thread.
- Material that matches the trunking’s thermal expansion.
- A positive mechanical stop to prevent over-tightening.
I tested a nylon bush on a vibrating compressor line. It held for months without loosening. The correct reducing bush keeps the joint reliable in tight spaces.
Threaded adaptors and male/female couplers
Threaded adaptors provide a mechanical bond where vibration would loosen a compression fitting. The external thread engages the conduit’s female thread while the spigot locks into the trunking’s knockout. Male and female couplers differ. A male coupler extends outward to join a female-threaded accessory. A female coupler receives a threaded conduit directly.
The choice depends on access at the trunking to conduit connection. I have seen installers above Johannesburg ceilings prefer a female coupler for faster alignment. A male thread permits screwing the conduit from either side.
Consider these specifics:
- Thread form must match the conduit’s metric standard
- Bore size must preserve the cable’s usable space
- Material should suit the environment, such as galvanised steel for coastal humidity
Each component carries its own responsibility in the trunking to conduit connection. A threaded adaptor holds alignment under load. A coupler preserves the cable pathway. Together they form a dependable installation!
Flush-fit connection boxes for surface mounting
A flush-fit connection box for surface mounting does more than hide the meeting point. It aligns the trunking to conduit connection within a shallow cavity, which suits walls where depth is scarce.
I prefer these boxes for retrofit work in Cape Town flats, because they sit level with the plaster, leaving a clean line. The box needs a removable lid for inspection and knockouts that match both trunking widths and conduit diameters. Without such a box, the joint becomes bulky, and the cover plate warps.
In coastal areas, a powder coated finish resists salt air. A captive earth terminal is essential, since the bond must survive vibration from nearby machinery. That small detail preserves the integrity of the entire assembly.
Glands and grommets for strain relief and sealing
Ever pulled a cable through a live installation and felt that sickening tug? That is where strain relief earns its keep. Glands and grommets do more than tidy the junction. They anchor the cable against mechanical pull, and they seal the opening against dust and moisture. For any trunking to conduit connection, this is the quiet safeguard that prevents failure months later.
I often specify a compression gland when the run enters a weather exposed yard. A rubber grommet works for dry indoor runs, but it lacks the bite of a braided gland. Choose according to the environment. The following points guide my selection:
- Check the IP rating against the installation space.
- Match the gland thread to the conduit entry.
- Use a locknut to secure the gland inside the box.
Without these details, the transition remains a weak point. A loose gland vibrates apart under load. Grommets also protect the cable sheath from sharp edges, so never skip this layer of defense.
Essential tools and accessories for a clean joint
Every trunking to conduit connection demands a degree of respect, because a sloppy joint turns into a frustrating pull later. I always carry a deburring tool and a fine file. These are the quiet heroes that remove the burrs left after cutting conduit, which would otherwise shred the cable insulation during installation. A decent measuring tape and a pencil are non negotiable. Marking your entry point precisely saves you from the embarrassment of a crooked hole.
- Fine toothed hacksaw or pipe cutter for clean edges
- Deburring tool or round file
- Spirit level for alignment
- Screwdriver set with the right bits
- Electrical tape and cable ties for temporary support
Once the holes are cut, I use a spirit level to check the conduit run before tightening anything. Conduit that enters a trunking at an angle looks bad and stresses the fitting. The other essential accessory is a proper support bracket near the transition. A floating joint will move and eventually fail. Keep your tools sharp and your patience sharper, because a clean trunking to conduit connection is not magic.
Step-by-Step Guide to a Secure Trunking to Conduit Connection
Measuring and cutting trunking to the correct length
A junction that sits crooked or pulls away from the wall ruins the entire route. The measurement of the trunk before it reaches the conduit decides this outcome. In the South African climate, where heat waves soften PVC and Highveld winters shrink it, a precise fit matters. The trunking to conduit connection relies on the dimensional stability of the housing.
Use a steel tape or laser measure. Account for the depth of the conduit adaptor, not just the length between walls. Cut the trunking square with a fine-tooth hacksaw, then file the edge to remove burrs. A dry fit before final fixing catches mismatches. Slide the trunking into the coupler along its long axis, then seat the conduit into the adaptor before locking the trunking into its clips. That order prevents jamming when installers screw the trunking down first. A gap at this joint allows moisture to enter, compromising the entire trunking to conduit connection.
Preparing the conduit end: cutting, threading, and de-burring
Cutting the conduit end is where most trunking to conduit connection failures start. I always mark the pipe with a pencil, then use a hacksaw with a sharp blade. A steel pipe cutter works better for rigid conduit, but for PVC a fine saw works well. After cutting, the thread becomes the next decision:
- For metal conduit, use a die stock with the correct thread pitch.
- For plastic conduit, skip threading and use a screw-on adaptor.
De-burring matters. A rough edge tears the rubber seal or bites into the coupler. Run a round file inside the bore and a flat file over the rim. These steps take three minutes, but they save hours later. A clean cut, proper thread, and smooth bore give the trunking to conduit connection a fair chance. If you skip deburring, the coupler may seat crooked, and that gap invites dust and water.
Fixing the adapter to the trunking base and aligning the conduit
Fixing the adapter to the trunking base demands patience. I prefer to drill pilot holes through the base and into the adapter flange, then drive the screws home with a manual driver. Overtightening warps the plastic and ruins the seal. Keep the fixing screws snug, never torqued.
Align the conduit before final tightening. A short carpenter’s level on the conduit will show any twist. The conduit should enter the adapter square, without force. If you must push, the mounting point is wrong. Adjust the conduit supports before you commit to the screws.
- Seat the adapter flush against the base.
- Hand-tighten the fixing screws.
- Bend or adjust the conduit supports first.
Recheck the alignment after the screws are settled. A slight offset will stress the trunking to conduit connection for years.
Joining the conduit to the adapter and tightening
Joining the conduit to the adapter is the moment where a trunking to conduit connection either proves itself or becomes tomorrow’s fault. Line up the threaded end and turn it by hand first. If it resists, back off and check the thread. A cross-threaded joint here means scrap parts and a wasted afternoon.
Once finger tight, hold the adapter body with a pair of grips and rotate the conduit with a second pair. One firm turn, no more. The conduit should sit square and proud. Then tighten the locknut against the adapter while holding everything steady. That locknut does the real work. Give it a gentle tug after. Movement means you are not done yet. A clean, dry trunking to conduit connection will outlast the wiring inside it.
Applying sealants for IP-rated and moisture-resistant joints
Sealing a trunking to conduit connection is where good workmanship becomes professional workmanship. Water respects nothing less than a proper barrier. In South African installations, humidity and seasonal rain find every gap you leave.
Choose a sealant that remains flexible after curing. Rigid compounds crack with thermal movement. Apply it around the adapter where it meets the trunking base, then again where the conduit enters. I prefer to work the sealant into the joint with a gloved finger, forcing it deep rather than leaving a surface bead.
- Seal the adapter flange before you push the conduit through
- Run a second pass around the locknut once tightened
For IP65 and above, inspect the gasket and the gland before you tighten. A single torn seal compromises the entire rating of your trunking to conduit connection.
Common Mistakes and How to Avoid Them
Mixing metric and imperial dimensions
Nothing ruins a neat trunking to conduit connection faster than mixing millimetres with inches. South African installers often receive imported fittings sized in imperial units, while local trunking is metric. A 20mm conduit and a half inch thread look almost identical, but they are not compatible. I have watched an installer force a coupling until it cracked. The wasted material was small; the rework took an afternoon.
Check every adapter label before cutting. Use a digital caliper to measure the actual thread diameter, not the nominal rating. Write the unit on the component with a permanent marker. That habit stops the “it almost fits” trap before it starts.
- Measure the thread pitch and outer diameter on every fitting.
- Keep metric and imperial adapters in separate, labelled containers.
If a hybrid connection is unavoidable, select a certified transition fitting made for the exact sizes. Never rely on tape or force. A deliberate approach keeps your trunking to conduit connection watertight and code compliant.
Leaving sharp edges that damage cable insulation
Sharp edges ruin a well made joint slowly. When I inspect a failed trunking to conduit connection, the culprit is often a burr left on the cut mouth. The cable slides in cleanly, the adapter tightens. Weeks later, the insulation frays against that rough rim. In South Africa, vibration from heavy equipment makes the damage spread faster.
A hacksaw leaves a ragged edge if the blade wanders. A pipe cutter pinches the metal inward. Both chew through PVC sheathing over time. Some installers argue the adapter covers the cut. It does not.
- Run a finger along the inner rim before assembly. You will feel what the eye misses.
- A half round file removes the burr in under a minute, even on clean cuts.
The fix is quick. The rework costs a full cable pull. That asymmetry should guide every installer seeking a trunking to conduit connection that outlasts the wiring.
Over-tightening fittings and causing stress fractures
About a third of plastic adapter failures trace back to over-torquing, yet the mistake feels harmless at the moment. A trunking to conduit connection should seat snugly, not fight the installer. When the fitting resists, the temptation is to force it. That is when stress fractures start.
Common slip-ups:
- Using pliers on a fitting rated for hand tightening
- Skipping the alignment step and tightening from one side first
- Mistaking friction for full engagement
The plastic around the thread develops white stress marks, then cracks. Over time the fracture widens with temperature cycles, and South African summer heat accelerates the process, exposing the wiring. A properly tensioned joint should feel firm, not brutal. The security comes from correct seating, not extra force.
A trunking to conduit connection that flexes with the building will outlast one locked down rigid.
Overlooking earth continuity and bonding requirements
Earth continuity often loses out to visual neatness. A trunking to conduit connection looks complete when the adapter seats perfectly, yet the electrical bond may be missing entirely. I have seen tidy installations fail a continuity test for exactly this reason. The risk is especially high with PVC conduit and coated trunking, where no inherent metallic path exists. Installers should verify continuity with a low resistance ohmmeter, not assume it from tight threads. Common slip ups:
- relying on the adapter’s metal ring to carry fault current
- painting over earth terminals during installation
- leaving the earth conductor too short to reach the bonding point
Each of these oversights turns a simple transition into a shock hazard. In South Africa, where earthing systems are mandatory, the cost of forgetting is far higher than the few minutes needed to test the bond.
Standards, Compliance, and Best Practices
Relevant British, European, and international standards
South African installations must comply with SANS 10142, yet the trunking to conduit connection often escapes close inspection. BS 7671 and IEC 60364 provide the wider framework for safe electrical design. These standards govern mechanical protection, cable support, and access to conductors at the transition point.
For hardware specifically, IEC 61386 sets performance requirements for conduit fittings, including impact resistance and temperature rating. Installers should match the adapter to the enclosure classification. Common references include:
- SANS 10142 for wiring installations
- BS EN 50086 for conduit systems
- IEC 61386 for fitting performance
Certification marks on the adapter confirm compliance. Unmarked components create measurable risk during inspection and later fault tracing.
Understanding IP ratings for indoor and outdoor connections
The IP rating on a transition fitting is not a decorative sticker. It states, in the least romantic way possible, whether your trunking to conduit connection will survive a Cape Town downpour or tolerate a dry Gauteng ceiling. SANS 10142 requires the enclosure to match its environment, not your optimism.
Consider what the rating actually covers:
- IP54 resists dust and splashing water, suited to covered walkways.
- IP66 handles powerful jets, appropriate for exposed exterior walls.
- IP67 survives temporary immersion, which is overkill unless you plan to install inside a fish tank.
Outdoor connections need more than a hopeful squeeze. Glands, grommets, and properly torqued adapters stop moisture from entering the conduit system. Indoor runs can pass with lower ratings, but the trunking to conduit connection remains the weakest point in a compliance inspection. Physical location dictates the ingress protection; a ceiling void and a factory washdown bay are not the same conversation.
Cable fill ratio and derating at connection points
Forty percent conduit fill is the accepted ceiling. But that figure assumes a smooth, consistent bore. The trunking to conduit connection introduces a narrowing. Cables that sat loosely in the trunking suddenly bundle together inside the adapter, and the measured fill ratio climbs past compliance without a single cable being added.
The derating calculation depends on three details:
- The adapter’s internal bore against the cable bundle’s true cross sectional area.
- Grouping derating factors for multiple circuits sharing the transition.
- The narrowest point of the transition as the base for every fill calculation.
Inspectors look at the visible joint. Engineers who understand thermal limits look at what the joint does to the cables.




0 Comments